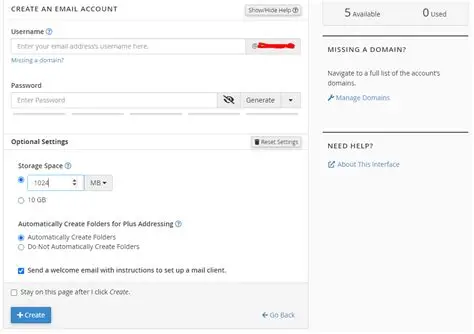
Setting up email quotas with your hosting provider is an important step in managing your email resources efficiently. Email quotas help prevent users from consuming excessive storage, ensuring that all users have access to their mailboxes without interruption. Here’s a step-by-step guide on how to set up email quotas with your hosting provider:
-
Choose Your Hosting Provider
Before you begin, ensure that you know the specific hosting provider you’re using (such as Bluehost, GoDaddy, SiteGround, etc.) as the process may vary slightly depending on the provider.
-
Log Into Your Hosting Account
– Access your hosting account by navigating to your hosting provider’s website.
– Enter your credentials (username and password) to log in to your control panel (often cPanel, Plesk, or another custom panel).
-
Navigate to Email Management
– Once logged in to the control panel, look for sections labeled Email, Email Accounts, or Mail.
– Click on the corresponding section to manage your email accounts.
-
Review Existing Email Accounts
– You will see a list of existing email accounts under your domain. Review the accounts to which you want to apply quotas.
– Determine whether you want to set a quota for existing accounts or create new accounts with specific quotas.
-
Set Email Quotas
For Existing Accounts:
– Locate the email account for which you want to set the quota.
– There should be an option like Manage, Edit, or Change Quota next to the respective email account.
– Once you click it, you’ll typically find a field to enter the storage limit. This limit may be represented in megabytes (MB) or gigabytes (GB).
– Enter the desired quota amount and save your changes.

For New Accounts:
– If you are creating a new email account, look for a Create Account or Add New Account button.
– Fill in the required details (username, password, etc.).
– Enter the desired quota in the quota field, if prompted.
– Save the new email account settings.
-
Validate the Changes
– After setting or modifying quotas, it’s advisable to verify that the changes have been applied successfully.
– Log out and log back into the control panel or check the email account settings to ensure that the new quotas are reflected correctly.
-
Monitor Email Usage
– Regularly monitor your email accounts’ storage usage. Some control panels offer built-in tools for monitoring usage, while others may require manual checking.
– Keep an eye on email storage limits, as exceeding the quota can lead to delivery issues or inability to send/receive emails.
-
Notify Users
– If you are managing email accounts for multiple users, inform them of the quotas and provide guidelines on managing their email storage effectively.
– Encourage users to regularly clear out unnecessary emails and attachments to stay below their storage limits.
-
Contact Support for Assistance
– If you encounter difficulties setting up email quotas or if your hosting provider does not support this feature, don’t hesitate to contact their customer support team for assistance.
– They can provide step-by-step guidance or make the necessary adjustments for you.
Conclusion
Setting up email quotas is an essential step in managing your email resources effectively, especially in a business environment where multiple users rely on the same domain. By following these steps, you can ensure that you maintain control over your email storage and help prevent disruptions in service. Always keep an eye on storage usage and adjust quotas as needed to optimize your email management strategy.

