

Setting up domain forwarding is a common task for website owners who want to redirect visitors from one domain to another. This can be useful for various purposes, such as consolidating multiple domains, redirecting from a non-www version to a www version, or simply ensuring that users reach your main site regardless of the URL they enter. Here’s a step-by-step guide on how to set up domain forwarding with your hosting provider.
Step-by-Step Guide to Set Up Domain Forwarding
Step 1: Log in to Your Hosting Account
- Access Your Hosting Provider: Visit the website of your hosting provider and log in to your account. You’ll usually need your account credentials (username and password).
Step 2: Locate Domain Management Section
- Find Domain Management: Once logged in, look for a section labeled “Domains,” “Domain Management,” “Domain Settings,” or something similar. This section will provide you access to the domains you own and their settings.
Step 3: Select the Domain for Forwarding
- Choose the Domain: Select the domain you wish to set up forwarding for. There may be a list of your registered domains, so click on the one you want to redirect.
Step 4: Find Forwarding Options
- Forwarding Settings: Look for an option or tab related to “Forwarding,” “Redirects,” or “URL Forwarding.” The exact wording may vary depending on your hosting provider.
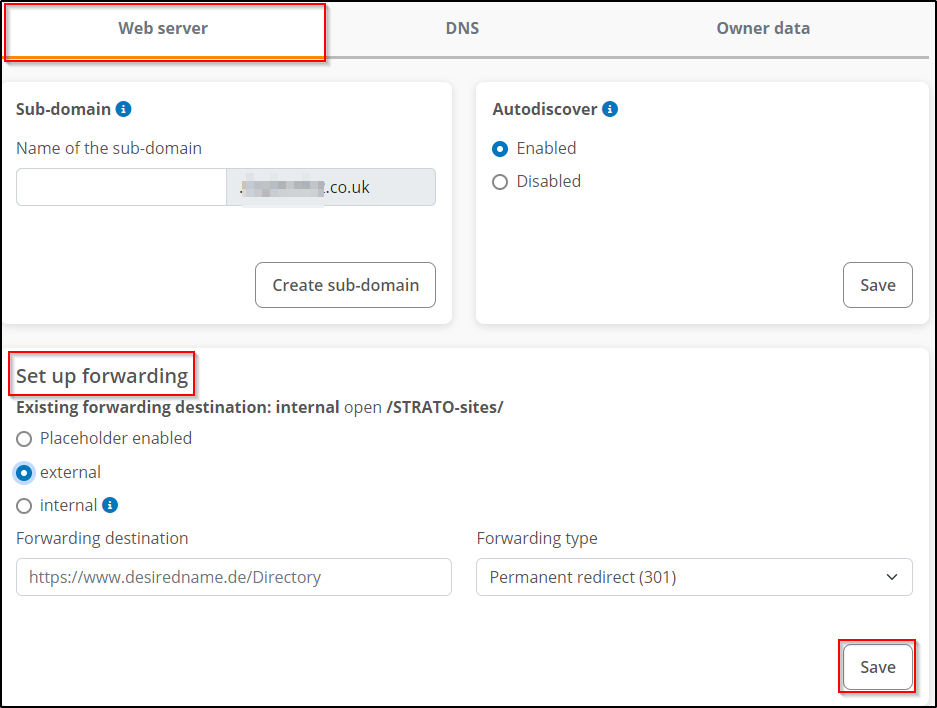
Step 5: Choose a Forwarding Type
-
Select Forwarding Type:
– 301 Redirect: This is a permanent redirect and is preferred for long-term redirection. It tells search engines that the original URL has permanently moved to a new address.
– 302 Redirect: This is a temporary redirect and tells search engines that the original URL is temporarily moved, but may come back.
– Forward with Masking: This option keeps the original URL in the address bar, but it may lead to issues with SEO and can be confusing for users.
Step 6: Enter Destination URL
- Specify Target URL: In the appropriate field, enter the URL of the destination site to which you want to forward visitors. Ensure that the URL is entered correctly, including the protocol (http:// or https://).
Step 7: Configure Additional Settings
- Additional Options: Depending on your hosting provider, there may be additional settings for forwarding, such as enabling or disabling specific forwarding features. Review these options and adjust them according to your needs.
Step 8: Save Changes
- Save or Apply Changes: After configuring everything, make sure to save your changes. Look for a button labeled “Save,” “Update,” or “Apply” to ensure that your settings are recorded.
Step 9: Test the Forwarding
- Check Forwarding: After you’ve set up the forwarding, wait for a few minutes (it may take some time for DNS changes to propagate) and test the domain by entering it into your browser. Ensure that it redirects correctly to the desired URL.
Troubleshooting Common Issues
– Propagation Time: DNS changes can take a while to propagate. If you don’t see the forwarding working immediately, give it some time (up to 24 hours in some cases).
– Clear Browser Cache: If you’ve recently visited the old URL, your browser might cache the old page. Clear the cache or try accessing the URL in an incognito window.
– Check with Support: If you encounter any issues or cannot find the forwarding option, reach out to your hosting provider’s customer support for assistance.
Final Notes
Setting up domain forwarding is a straightforward process, but it’s essential to ensure that you choose the correct type of forwarding based on your needs. A well-configured redirect improves user experience and maintains your site’s SEO integrity. By following this guide, you can successfully set up domain forwarding with your hosting provider and ensure that visitors reach the intended destination.